
Primal Earth
There are places in this world that defy expectations of how a landscape should look; places that are twisted and broken; places that are filled with other-worldly forms and shapes; and places that shift the spectrum of what we might think are normal hues for a landscape on planet earth.
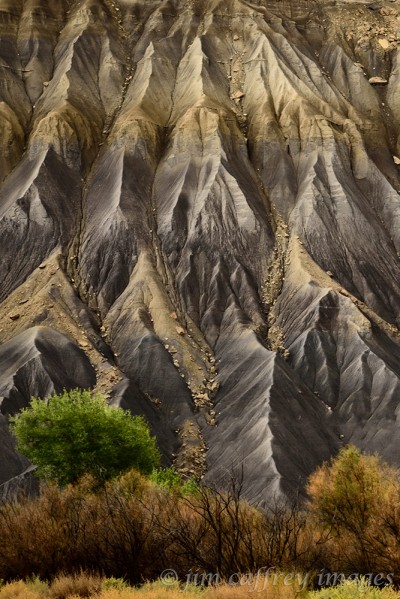
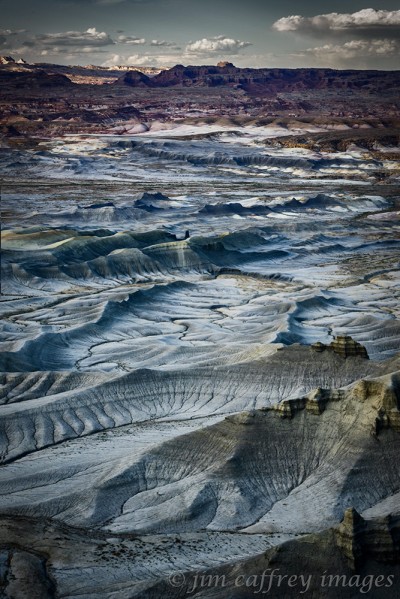
Utah is certainly one of those places and in a small, overlooked area in the center of the state, where a layer of Mancos shale has been exposed by the elements, there lies an expanse of bluish colored earth, which depending on the light, might be a subtle grayish blue, or a more deeply saturated aqua-blue.
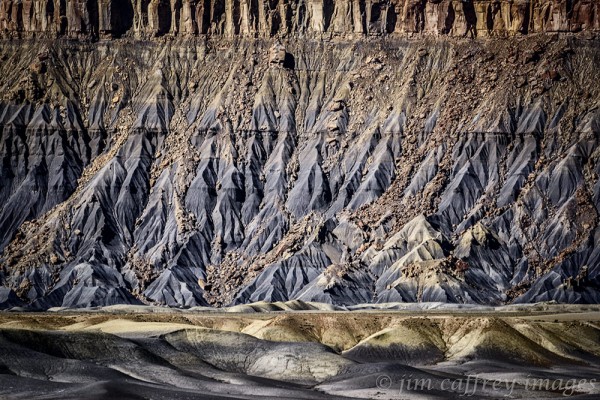
In every instance, the landscape is surprising; the texture can range from rough and deeply creased to smooth and almost sensual. In some places, it resembles a network of arteries (which, I suppose, in a way, it is).

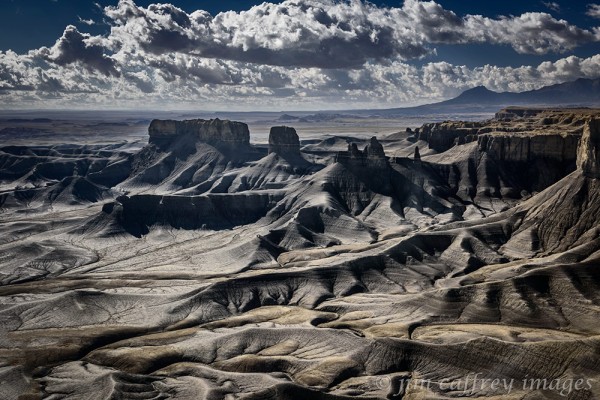
In other places, it is a series of waves advancing on some forgotten beach. But everywhere there is at least a hint of blue. When you are used to red, sepia, or even more common grays and browns, the change can be quite startling. One location, in particular, was a prize we had to spend a little time searching for. Factory Bench overlooks what has come to be known as the Moonscape Overlook. It is a place that changes your perception of how the world should (or might) look.

If the light is right, the whole experience becomes exaggerated by the deep shadows playing over the complex terrain. Every twist and turn, every sinuous channel becomes more deeply etched into the unearthly earth.
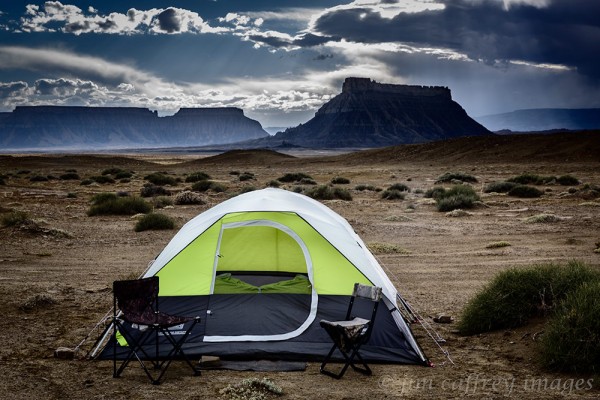
Spending a night on the plateau above these badlands was an adventure in itself. A storm, which had been building throughout the day, moved in around sunset. Wind whipped the tent through the night and several times I was sure our shelter would be ripped away from us. But our little Coleman prevailed and by morning, things had calmed down enough that we could have a peaceful breakfast.
This last image was made looking east across the broken, variegated wilderness. Not far from here is the Mars Research Station where teams of scientists and engineers have been spending long periods of time in a simulated habitat to prepare for a possible trip to the red planet. The remote and other-worldly landscape allows them to make their preparations without light pollution or other outside influence.
On this same trip, we spent time in Capitol Reef and Goblin Valley. Probably it was the crowds and touristy nature of those parks that turned me off (I am a hopeless misanthrope), but neither of them had an impact on me as strong as did the blue badlands of Caineville Mesa and Factory Bench.
Share this:

Winter On The Burn
We have had two major wildfires here in the Jemez Mountains over the last four years. Each destroyed well over 100,000 acres leaving large tracts of forest scarred with the burned skeletons of once majestic conifer trees. After a while, you get used to the desolation. It can even have its own kind of harsh beauty.

The East Fork of the Jemez River flows through Las Conchas where the 2011 Las Conchas wildfire started.
Winter can be especially beautiful in a burn. The tonal contrast between the white snow and the black, charred trees is striking. The textural contrast between the trees on a burned ridge and a lowering storm cloud provide strong elements and tell a story of loss reconciled by time and weather. We can use such conditions to make more compelling images.

Mixed conifers which were burned in the Las Conchas wildfire in 2011 coated in a layer of hoarfrost
When conditions are right, the bones of the dead trees become coated with hoarfrost and are transformed into fragile, crystalline structures. You can almost hear the tinkling of their branches as they sag under the weight of the frost.

Conifer skeletons left over from the 2011 Las Conchas wildfire dressed in a fragile coating of hoarfrost
When the sun breaks through a low-hanging bank of clouds, the light is transformed; it becomes, in a way, magical. The shadows and the mist of the clouds create a kind of frame that surround and isolate the area which is lit, making it the focal point of the composition.

Cerro La Jara in the Valle Grande is illuminated by the sun through a break in the low hanging clouds that cover Redondo Peak which burned in the 2013 Thompson Ridge wildfire.
Otherwise unremarkable elements of the landscape become worthy of attention when they are enhanced by a coat of frost.

Mixed conifers that survived the Cerro Grande wildfire in 2000 stand covered in a thick coat of hoarfrost
They come front and center when the rest of the scene is obscured by cloud cover. Such conditions reduce the clutter that would, under normal conditions, draw our attention away from them.

Mixed conifer trees that survived the Cerro Grande wildfire in 2000, their needles covered in a thick coating of hoarfrost
The last two images are successful only because of the low clouds which block the view of a conifer covered hillside. If we could see the entire scene, the trees in the foreground would become lost in the background of similar shapes and patterns. By using the softness and the simplicity of winter conditions, we can imbue otherwise unattractive or unworkable scenes with qualities that make them stand out, and render them more recognizable and appealing to the eye of a viewer.
Share this:

The Badlands Of The San Juan Basin
The San Juan Basin is a large, roughly circular, depression that lies in the northwest corner of New Mexico, and is a part of the larger Colorado Plateau. What makes the basin special is the fact that, at one time, it was in an area that was covered by the Western Interior Seaway, a prehistoric body of saltwater that split the North American continent from top to bottom.

The Western Interior Seaway
The location along the shores of a large body of water in a tropical climate allowed an incredibly diverse ecosystem to thrive. As these life forms died, they decomposed and were eventually covered by volcanic ash from the eruption of nearby volcanoes. As the seawater covered the area more sedimentation sifted over the remains and some of the sediment was infused with mineral rich water that seeped through the layers above making it harder than the surrounding matrix. This was an important step in the formation of the present-day hoodoos. The weight of the water compacted the entire assemblage, and it was lost to the the world above the waves.
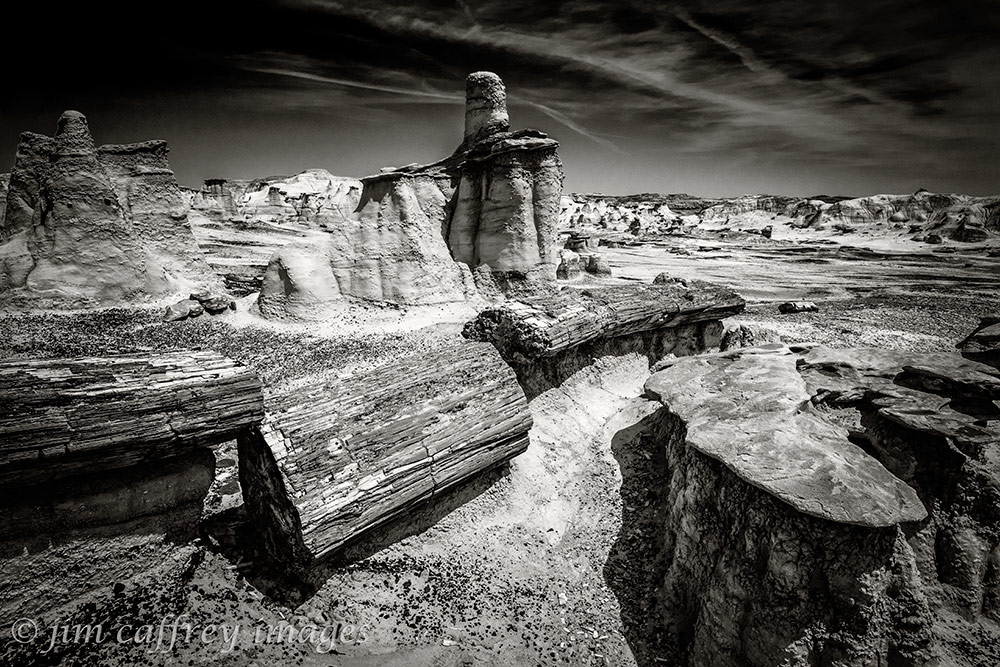
About 65 million years ago, the waters receded and a layer of sediment nearly two miles thick was left behind. Since then, plate tectonics, volcanism, and glacial erosion have helped to shape the present-day San Juan Basin. Further erosion from wind, water, and annual freeze/thaw cycles exposed the hardened sediment layers which eroded more slowly than the softer sand/ash matrix. The result is a wonderland of hoodoo gardens that are especially obvious along the edges of the many washes that criss-cross the basin. Some of these drainages such as Ah Shi Sle Pah, Hunter and Alamo–the two washes that formed the Bisti, and their tributaries have carved and exposed a treasure trove of unlikely works of earthen art.
The human history of the badlands is of course relatively short. Probably the most significant event in shaping the area in the last hundred years was the discovery of coal and the associated coal-bed methane. By the early 1980’s coal mining, mostly to fuel the nearby Four Corners Power Plant, was consuming large tracts of land throughout the basin. Inevitably, the Bisti became the center of a lawsuit between the Public Service Company of New Mexico and the Sierra Club; PNM already had a mining operation there and it looked like it might become just another large open-pit mine. However, the courts sided with the Sierra Club and in 1984, the Bisti was awarded wilderness status. In recent years, Ah Shi Sle Pah has also become a Wilderness Study Area. So, at least for the present, these gems are safe from the insatiable maw of “progress”.
Of the nine recognized badlands in the San Juan Basin, the Bisti is the largest–at 30,000 acres–and most well known. It includes the Kirtland and Fruitland geologic layers and was deposited 70-75 million years ago. The chief deposits are: sandstone, siltstone, shale, coal, and volcanic ash. Fossils include remains of T-Rex and large cypress-like conifers.
Ah Shi Sle Pah is much smaller than the Bisti, but was deposited around the same time, and thus contains the same geologic layers. It contains the same deposits: sandstone, siltstone, shale, coal, and volcanic ash. The fossils found in Ah Shi Sle Pah include remains of crocodiles, Pentaceratops (which has been found only in Ah Shi Sle Pah), early mammals, and of course, petrified wood.
The other recognized badlands in the basin are: Ojito–the oldest having been deposited 144-150 million years ago–, De Na Zin (70 -75 million years ago), Lybrook, Ceja Pelon, Penistaja (all 60-64 million years ago), San Jose (38-64 million years ago), and the youngest, Mesa de Cuba (38-54 million years ago).

The map shows the boundaries of the San Juan Basin. Rather than being formed by volcanism like the San Juan and Jemez Mountains to the north and east, the basin was uplifted as a single block after which the center collapsed to create the basin.
The idea for this post came from a show I had last year called Badlands Black and White. I chose to print all the images in B&W in order to focus on the graphic elements: tone, texture, patterns, etc.

This image was made in Alamo Wash in the Bisti Wilderness. The cracks that result from the shrinkage of the clay rich soil tell a story of the arid environment. The sandstone balanced on the short mudstone pillars is an example of the hardened sediment and how it weathers in relation to the softer layers below it.

The floor of most badlands is usually littered with small pieces of debris, which is comprised of bits that have broken or eroded from larger structures. They can be shale, clinkers (super-heated clay), siltstone, or even glacial deposits from the last ice age. There are often fossilized bone and clamshells mixed in with all or some of the above.

I made this image of a client while leading a tour in the Bisti Wilderness. The man is standing on an ridge above a deep wash in the Brown Hoodoos section of the wilderness. I wanted to give the viewer a sense of scale and the feeling of being lost in the bizarre surroundings.

These eroded pillars are in a small alcove located in a tributary of Ah Shi Sle Pah Wash. Some of them still have their sandstone caprocks, while some have lost theirs. The badlands are an evolving story of creation and degeneration, once the protective cover of the caprock is gone, the erosion process proceeds at a much faster pace.

This image is from Ah Shi Sle Pah Wash. The squat hoodoos in the foreground are relatively new and haven’t weathered out to the extent that some of the taller, more widely spaced ones have. Like many of the places I frequent in the badlands, I can’t visit this one without making several exposures.

At Ah Shi Sle Pah, there is a small, raised enclosure; I call it the Dragon’s Nest. What caught my eye the first time I saw it were the patterns and textures eroded into the solidified volcanic ash. This formation, at some time in the past, probably had a sandstone cap-rock.

I made this image in Ah Shi Sle Pah Wash. This collection of hoodoos sits in the middle of a labyrinthine tributary wash. The small column on the right has lost its caprock and is undergoing accelerated erosion.

This is a formation in the Bisti Wilderness that I call the Queen Bee. It is part of a small area of similar formations known as the Egg Garden. The cylindrical shape of these eroded forms is due to them being formed and hardened inside limestone tubes. As the surrounding layers eroded away, they emerged as distinct egg-shaped forms. The Egg Garden is one of the most popular attractions in the Bisti.

This small arch is another feature that brings people come from around the world to visit the Bisti Wilderness. The Bisti Arch can be deceiving; the opening is only about three feet across and half as high. The first time I found it, after searching unsuccessfully during previous visits, I was surprised by how small it is. The top of the arch is made of siltstone supported by a volcanic ash pedestal, and was once part of a wall which stretched across Alamo Wash.

In his book “Bisti” which was printed in the 1980’s, David Scheinbaum included an image of this formation with the caption: “This unstable hoodoo is just within the Sunbelt coal-mining lease and will probably be destroyed by mining in the near future.” I made this image on a recent trip to the Bisti Wilderness, and I’m happy to report that the unstable hoodoo is still standing.
Share this:

The Creative Workflow (WYSIWYG)
I am constantly on the lookout for new images. Even while I’m driving, one eye is searching for a photograph. But, to really see, it is important that I be present so I can delve into the potential image, dissect it and study the relationships between the elements. What is the best way to do this? What should I look for as I move through this process?
The first step is to ask myself: What was it that drew me to this scene? Usually it was a singular object, or a play of light over the landscape. The Soaptree Yuccas, the sidelit patterns, and the subtle light on the sand dunes at White Sands National Monument were what grabbed my attention and led to this first image. Understanding my motivation made it easier realize what I want to say with the photograph.
Next I had to frame the scene in a way that would tell the story in the best way possible. I placed the closest yucca up front, but a little off center, leaving little doubt that it was the main subject of the image. This placement also allowed me to separate it from the others in the middle ground and avoid a confusing and static composition. My choices for the exposure had to be based on the dynamic range of the scene, which, In this case, was pretty wide considering the bright highlights on the sand in the distance, and the dark tonality in the shadows near sunset.

Yuccas on a textured dune field at White Sands National Monument
The first technical requirement was that I capture a broad dynamic range, so I made a bracketed series of exposures that covered the entire spectrum of tonalities in the scene. Even though I didn’t need to use all the different exposures, it’s better to have them and not need them than it is to need them and…well you know. The next requirement was that the depth of field be wide enough to have sharp details front to rear. Because of the low light level at the time of day I was shooting this, the fact that I was shooting at the lowest possible ISO–to achieve the best possible image quality, and the small aperture needed to get the depth of field I required, my shutter speed was relatively slow–1/10th of a second. That meant that I needed to shoot with my camera mounted on a tripod (something I usually do anyway). It’s easy to see from this cause and effect chain how my creative workflow was based not only on composition and design elements, but also included technical considerations.

Sandhill Cranes at twilight in a pond at Bosque del Apache NWR
The second image of Sandhill Cranes at Bosque del Apache National Wildlife Refuge was made at twilight, that special time in the evening just after the sun set and the light is bouncing off the upper atmosphere. I was taken by the reflection of the colored sky and the reeds in the placid water of the foreground, and the transition from the smooth to the to the rough texture of the water, which created a layer-like effect because of the sudden change in color and texture. This layer is also where the action takes place: the cranes mingling, spreading their wings, foraging for dinner. There is then an abrupt transition to the golden reeds and the darker background before the final shift to the lighter tonality and magenta shades of the distant mountains and the sky.
I had my camera mounted on my tripod as usual, but I kept the bullhead swivel loose so I could easily pan to follow the movement of the birds. This image also relies on a wide depth of field to preserve sharpness in the details of all the layers mentioned above. I wanted to make the layering effect more obvious, so I boosted the saturation and contrast a little. Once again, the thought process kicks in and the decisions are made. The point of all this is to stress the importance of being involved in the making of an image. If you want a photograph to be yours, you need to put a little of yourself into it, and you need to be intentional throughout the process.
Share this:

Two Birds
I killed two birds with one stone the other evening: I did some “blue hour” photography, and I made some panorama images. I have been wanting, for some time now, to get out and photograph the “blue hour”. For those of you who are unfamiliar with the term, it refers to the hour before sun-up or after sundown when the light from the setting sun is reflected in the upper atmosphere. The more common name for this time is twilight, and it is divided into three distinct phases: civil, nautical, and astronomical. The duration of twilight changes depending on the time of year, and the latitude from which it is being observed. The blue reference has to do with the color of the light which has a wonderful bluish cast to it and is diffuse without any harsh shadows. So, I finally made myself go out into the diminishing day and drive to the Rio Puerco Valley. The prospect was sweetened by the full moon which would be rising about half an hour after sunset.
-

Cabezon Peak and Cerro Cuate dominate the skyline as the sunset is reflected in the twilight sky in New Mexico’s Rio Puerco Valley
I arrived at my destination two hours before moonrise and set about scouting the area for a good location to photograph the event. Since I am quite familiar with the place, it didn’t take me very long to find what I was looking for. I set up my camera on a tripod and began making test images to determine the correct exposure. As the sun went down and the light softened, I began taking several series of vertical photographs which would later be stitched together in Photoshop to create the final panorama. The first image was made about thirty minutes after sunset and about twenty minutes before moonrise.
-

A herd of cattle returning home after a hard day grazing in New Mexico’s Rio Puerco Valley.
The second photograph was actually made earlier than the first, but it was more of a test to get the feel for shooting the panorama and I didn’t expect to take it any further. After all, it’s full of cattle, which I consider to be a blight on the landscape. But, in the spirit of expanding my horizons (thank you Robin), I processed the image and, as it turned out, I liked it.
From the information I had gathered from The Photographer’s Ephemeris, I expected the full moon to rise somewhere between Cabezon Peak (the volcanic plug in the distance) and Cerro Cuate (the more prominent double peaked mount). But as the horizon began to brighten I was somewhat dismayed to discover that the moon was not where it was supposed to be…well at least not where I expected it to be. I checked the app on my iPhone again and saw that my expectations were based on a location that was actually a couple miles east of where I was.
-

A full moon rising, but obscured by clouds, between Cerro Cuate and Cabezon Peak in the Rio Puerco Valley in north-central New Mexico
I had planned to include the moon with the two mountains in the composition; that wasn’t possible from the place where I was standing. Now I had to re-think my plans, knowing that my window of opportunity was small if I was going to capture the moon close to the horizon. I quickly packed everything into my car and drove to the new location, walked to a place which afforded a clear view of the scene, set up, and composed the last image. By now it was dark, I was shooting thirty second exposures, and I was having to focus manually–auto focus doesn’t work very well in the dark. This being my first attempt at photographing at this time of day, and making panoramas, I wasn’t really very hopeful about the outcome. As full dark descended, I pack up my gear by the light of my headlamp and headed home.
The next morning I set about uploading and processing my previous night’s work. Each panorama is composed of nine vertical images which are then stitched together in Photoshop. As the first panorama was rendered I knew I was hooked. Somehow, despite the comedy of errors I had experienced while making the images, I managed to walk away with some finished photographs that I was happy with. It’s always an exhilarating feeling to discover a new technique and this was no exception. I made a few mistakes; there are some things I will do differently in the future, but overall, I’m happy with the way things turned out. It was a good night’s work.
Share this:

Working With Light
Light can be a funny thing. One minute it’s soft, throwing just the right combination of highlights and shadows across a scene; then the sun comes out of the clouds, the light becomes harsh, and your scene becomes a hodgepodge of extreme contrast. While some photographers prefer harsh light for their landscapes, I have always looked for soft diffuse light in my landscape work. Perhaps my preference has something to do with my earlier close-up/macro work. Whatever the reason, I don’t care for a lot of edgy contrast in my photography.

In this image of lignite mounds and clinkers taken in the northern part of the Bisti Wilderness, the light is soft, but provides enough contrast to give shape to the features of the landscape.
If you think of your landscapes as portraits, which I do, this makes more sense. Any areas that are in deep shadow are hiding a part of the scene. Not only that, they are distracting and even extraneous. Crafting a fine landscape image can be much like writing an essay or novel: you have to finesse each element until it flows well with the rest of the composition. Of course there are times when you have to just accept the conditions you have and if you’re working in harsh light, you need to be aware of how to use the light to your advantage, and how to make adjustments later in post processing if necessary.

I made this image of rabbitbrush in a wash deep in the Bisti Wilderness. The light was harsh and I was shooting almost directly into it, but the wide dynamic range of my Nikon D 800 managed to capture all the information in one exposure. I was also able to make highlight and shadow adjustments in Lightroom during post processing.
This can be accomplished in several ways. Newer cameras are pretty good at capturing wide dynamic ranges within a photograph. Often, one exposure is enough to get all the information needed to produce a good final image. If you are unable to capture all the tones in the scene, you may need to make a series of bracketed exposures and combine them later in HDR software or by blending the exposures in Photoshop. There was time, not so long ago, when I shot five exposures for every image, and then blended them in Photomatix Pro. Now I try to get it all in one exposure. I only bracket exposures under extreme conditions.
Post processing software is becoming much better at making tonal corrections; the highlights and shadows sliders in Lightroom work wonders on a high contrast image. High ISO and low-light noise reduction are also much better in the newer cameras, and the ability of editing software to deal with these problems in post is advancing quickly. So, the tools are available, making good, even great, images under extreme lighting conditions is becoming easier, and the results look better than was possible just a couple years ago.
On a final note, I use Adobe Lightroom 5 and the latest version of Photoshop CC, but there are quite a few very good options out there. On One Software’s Perfect Photo Suite is just one example.
Check out more of my work on my website: http://www.jimcaffreyimages.com
Share this:

Textural Fluency
Texture as a design element is often made to play second fiddle to some of its more obvious kin: line, color, even shape; but it can be a very effective tool in our bag of photographic tricks. It is important here to note the difference between tactile and visual texture. Tactile texture is what we feel when we touch a surface whether it be two dimensional–a piece of fabric, or three dimensional– a marble sculpture. Visual texture is the representation of a three dimensional surface in two dimensions. As photographers working within the confines of two dimensions, we are limited to the visual representation.
Everything has texture. It can be rough and aggressive, it can be smooth and subtle, or it can be somewhere in between. In this image the textures range from rough (the trees) to softer (the grasses) to softest (the low clouds). Texture can make an image more interesting by inviting the viewer to explore the interactions and relationships between the visual elements within the frame.

Textural differences add another design element to an image: contrast. The visual contrast in this image of cottonwood trees during a winter storm gives the viewer a reason to delve more deeply into the image; it attracts the eye and lets the person viewing the image know that I found the contrast between the low hanging clouds, the trees, and the grasses interesting enough to stop and make a photograph.
On another level, the repetitive, more aggressive texture of the trees in the photograph creates a pattern or motif which stands out and dominates the more subtle blending of the background clouds and foreground grass, so the trees become the focal point of the image. Finally, the different textures within the image create layers which add depth both visually and conceptually.
Share this:

Finding Beauty
As photographers, it is our job to discover beauty in the commonplace, everyday subjects or interactions that we encounter. Usually, it is a challenge; rarely it is serendipitous. A change in the quality of the light, or a change in the relationship of the elements can make a dull, uninspiring view come to life. It is important that we remain vigilant or we will miss the fleeting opportunities that appear, seemingly, out of nowhere and then disappear just as suddenly.
I came upon this scene while driving the south loop at Bosque del Apache NWR. At first glance, I was not certain that it would make a compelling image, but the longer I studied it, the more potential I saw. The textural contrast was striking, and the color palette pleasing.
If you analyze the image, several things should be obvious: the reflection of the trees is somewhat blurred by the moving water, but there is still a feeling of quiet calm. The texture of the grasses and smaller trees add a subtle counterpoint to the tranquility, the color triad: blue, yellow, and red unify the composition, and the brooding sky lends a natural vignette to the scene.

Paying attention to these elements and emphasizing them during post-processing resulted in the image you see. Your interpretation of a scene and the way it looks in the final outcome, is subjective and is only limited by your own imagination and creativity.
Share this:

Stepping Out Of Your Comfort Zone
It’s easy to fall into a rut. It’s not so easy to climb out of one. Often when we find a certain process, or visual framework that works for us, it becomes hard to move on from there. This kind of dependency works against the creative process by stifling our ability to see things in a new way. Sometimes the only way to escape this trap is to be intentional and to actively seek new answers, new ways of seeing or experiencing the world around us.

It matters little if you are famous or unknown, creative growth demands that you evolve. It is the natural order of things. If you find a niche in which you are comfortable, it is important that you keep exploring new ideas and processes, otherwise it is only a matter of time before your niche can become a prison from which escape will become harder and harder the longer you inhabit it.
So, how do we step out of our boxes? How do we change our habits to attain a new level of creativity? It can be as easy as changing a lens to work from a new angle of view, if your work is predominately wide landscapes, you may want to start doing close-up/macro work for a while. Experiment with black and white and learn what it takes to make a successful B&W image. By changing the way you think about and approach your work, you are, in effect, flexing your creative muscles, allowing the juices to flow, and opening new areas of exploration, thereby broadening your creative potential

I’m not saying that we need to totally discard the things that work for us, but we do need to keep the edge sharp. Like anything else in life, creativity suffers from narrow-mindedness. So, don’t be afraid to try something new or different. The results may surprise you.
Share this:

Chasing The Glow
Photography is greek for painting with light. So, it follows that any kind of light should be fair game. Right? I have never been a shoot-into-the-light kind of guy, but sometimes all it takes is for a scene to jump out and dare me not to capture it. Such was the case with this image of Jemez Pueblo. The distant mesa and buttes were backlit by the evening sun and the cottonwoods in the middle-distance were glowing . The ephemeral balance this created was too good to pass up. What I am trying to say is that if you can successfully overcome your biases, you may find a powerful new way to express your creativity.

The second image is of a scene I pass every day as I drive home. But, on this particular day, the light was exceptional ; the atmospheric conditions created the perfect backdrop, the trees and grasses along the river were aglow and in full regalia. It was as if the entire landscape was shouting “Look at me, look at me”. An everyday, commonplace view had been transformed by the nuances of the light.

In both cases, I could easily have kept driving and missed the opportunity to make these photographs. It is at times such as these that I need to give myself a little shove, to overcome inertia and see what I can see. If I had not taken the time to capture these images under these conditions, the magic would have been lost and the same scenes would not have had the same impact the next time I saw them.
If you click on either of these images, you will be directed to my website. I am offering 20% off on all purchases from now through the end of the year. Just enter the code HOL14 (no spaces) at checkout.
Share this:

Sanding The Stone
Telling a story about a place using images isn’t necessarily as straightforward as it may seem. There are many layers of information; some need to be added to, others subtracted from. In the case of the badlands of the San Juan Basin, the latter is the case.

The landscape itself is in fact formed by subtraction. It is eroded by the force of wind, and water over time. Things are not always as they appear. The tree trunk in the first image is no longer composed of wood; it has, over time, become transformed by minerals that replaced the dead organic matter, making it a petrified semblance of its former self.

This layered channel sandstone was infused with minerals which leeched into the ground making it harder than the surrounding matrix. As the accumulated sedimentation eroded, the harder stone was left exposed.
Much like the landscape, these photographs were created by removing some of the information, more specifically, the color. A black and white image presents the bare bones of the subject and allows the viewer to see the underlying structure.
Most of us are subconsciously influenced by colors. We make associations between colors and a certain emotion or mood, so removing the color eliminates the preconceived idea, which in turn leaves us free to experience an image in a more visceral way.

The badlands are a visual experience; the textures, shapes, and patterns inherent in the stone and clay are extraordinarily diverse. So, whether the image is one of more intimate proportions as in this photograph of a small alcove in Ah Shi Sle Pah, or of a grander scale like the image of the Bisti Arch shown below, the simplicity of the black and white image allows the landscape to stand on its own merits.
And while the yellows, reds, browns, greens and magentas which paint these amazing places with an astounding palette, play a role in telling the whole story, the absence of those colors conveys the essence of their austere beauty.
Share this:

Focal Lengths, F Stops, and Tripods, Oh My
This is a post about gear (particularly lenses) and why I chose it (them) to make a specific image. I teach a digital photography class at a nearby college and one of the things I cover in that class is the effect that the angle of view (the angle of coverage of the lens) can have on how the image is perceived by viewers. There are four categories: broad landscapes (wide angle), intimate landscapes (normal to short telephoto), compressed landscapes (mid-long telephotos) , and macro/close-ups (macro lens).

This image of a small wash full of water was made in the Rio Puerco Valley after a monsoon rain. It is an example of a broad landscape; the depth of the image from foreground to horizon is exaggerated. I used a wide angle zoom with an aperture of f 22 to give me the depth of field I needed to keep everything sharp.
Nikon D800, Nikkor 17-35mm f2.8 @ 17mm; 1/30sec, f22, ISO 100, tripod

I made this image in Blue Canyon on the Hopi Reservation in northern Arizona. It is an intimate landscape; the area covered, side to side and front to back, is relatively small compared to the broad landscape. There is a feeling of immediacy or closeness about the image, as if it could fit in your living room. I used a medium telephoto zoom set at an aperture of f 11.
Nikon D700, Nikkor 28-70mm f2.8 @ 35mm; 1/25sec, f11, ISO 100, tripod

Using a telephoto lens causes an image to compress, so distant objects seem closer. A telephoto lens does not exaggerate the depth of the image the way a wide angle lens does. Instead, it causes elements to flatten, making the distance from foreground to horizon appear shorter, and making the elements in between appear more closely grouped.
Nikon D700, Nikkor 80-200mm f2.8 @ 200mm; 1/25sec, f8, ISO 100, tripod

There is something about the the world that lies right at our feet that is compelling. Although it is normally common and quite ordinary, given a little attention and a skilled eye it can become extraordinary. This is the world of close-up or macro photography. There is no need to travel to exotic locales when there is an unending source of interesting subjects to be found in your own back yard.
Nikon D300, Nikkor 105mm f2.8 macro; 1/60sec, f8, ISO 200, tripod.
Share this:

A Day In The Life
I recently took the Amtrak Southwest Chief from Albuquerque to Chicago. I was excited because it was my first time on a train and the possibilities for meeting people seemed endless.

While I was waiting for the train in Albuquerque, I heard a soft voice say something about standing so close to the tracks, and how dangerous it was. It was Reba the baggage handler. When I assured her that I would move before the train arrived she relaxed and we introduced ourselves. My journey was off to a good start.

Once the train pulled in, the activity on the platform increased: people arriving and departing, hawkers selling southwestern doodads, and the car attendants and conductor directing people to their seats. My excitement about the trip was not because I am provincial; I have travelled quite a lot by plane and by car, but flying is so impersonal and efficient and driving rarely takes me off the beaten path. Taking the train, on the other hand is a mode of transportation that invites interaction with others while affording the opportunity to engage the landscape (even if it is a fleeting engagement).

Along the route, we passed through small towns situated at the edges of the so-called modern world, towns with no big box stores and no motel/restaurant franchise row. The people who live in these places, live life at a slower pace where the most excitement they might have is watching the train come into the station. Lamy, New Mexico is such a place; the last census reported that 237 people lived there. And, even though it is less than twenty miles from Santa Fe, the feel of the place is definitely backroads, small-town.

There are memorable characters to be found just about anywhere, and the train was no exception. Clarence introduced himself to me not more than a minute after we left the Albuquerque station. He noticed my camera and informed me that he had been a photographer for Life magazine. As the trip progressed, I also learned that he was a CIA operative as well as a mortician. It was near the end of the journey when he appeared in this getup and soon had the entire car singing Christmas carols. Clarence didn’t know more than a few words of each song, but that didn’t stop him, he just hummed his way through until he came to a part that he knew.

I was surprised to see a fairly large number of Amish riding the train. I asked one of them about this and was told that they are not allowed to travel by air, so they do their long distance traveling by rail. I photographed this young Amish man along with our train at Union Station in Chicago.

I had never been in Union Station before and as I began making my way up through the bowels of the building to find my connection, I saw a sign that pointed the way to The Great Hall. I followed it and came into this wonderful space. At one time it was the center of activity in the station; now it is used for events and as a tourist attraction: several movies have been filmed there and the architecture is breathtaking.

I was drawn to the stairs that descend from street level. If you have seen the movie “The Untouchables”, you may recognize it as the stairway from the baby carriage scene. As you proceed up the stairs and out onto Canal Street, you will find yourself in this beautiful portico. The lighting was too much to resist.

The next leg of my journey was by bus and I was suddenly back in the rat-race: people plugged into their phones or staring at their computer screens as we crawled through Chicago traffic.
Share this:

A New Perspective
On a recent Photo Tour in the Bisti Wilderness, I decided to change my approach. I did this by bringing my D300 (DX Format) instead of my D700 (Full Frame Format). I also left my tripod at home–something I never do. But I was trying to step outside of my box, get out of my comfort zone, and try to re-charge my creativity.

One of the things I had no control over was the atmospheric conditions. Most of you who know my work are used to seeing dramatic, brooding skies in my images, but sometimes mother nature doesn’t co-operate, so I compensated by limiting the amount of sky I included in my images, concentrating instead on the fore and middle-ground. I made the first image in the area known as the Brown Hoodoos. I wanted to emphasize the variety of colors that are prevalent in the landscape, the reds, blacks, greens, and browns that help make the Bisti a visual feast.

This hill stands alone near the edge of Alamo Wash. It has become a landmark for navigation. Yes, even with a GPS, I still navigate by sight at times.


These two images are from the Bisti Arch. The first is a repeat of an image I made last year using my full frame camera and 17-35 mm lens. The second is from a bit further away and looking past the arch towards the southeast.


The Egg Garden is probably the most well known section in the entire Bisti Wilderness. So named because of the eroded rocks which resemble large eggs, the Egg Garden covers an area about the size of a football field.

The last image was made in a side wash about a half mile beyond the Egg Garden. There are several good size petrified trees and a large number of hoodoos. This is usually the last stop on my tours before turning around and heading back to the parking area.
Share this:

Mud, Stones, and Wood
There is no shortage of adobe ruins in the American southwest and there is also no shortage of photographs of those ruins. This poses a dilemma for photographers who want to find fresh ways of capturing an image.

So, how many ways are there to photograph ruins? I decided to share some of my techniques for making eye catching images of an often photographed theme. In the first image, I asked myself: “What drew your attention to this scene in the first place?” The answer: the corrugated tin roof and the color and grain of the door. So, I made a selection of those elements, inverted the selection, converted it to B&W, and added a sepia tint.

I made the second image in the ghost town of Guadalupe, New Mexico in the Rio Puerco Valley. I had photographed the two storey ruin many times, but this time I was looking for something different. I was walking around the small village, in and out of various ruined buildings when I saw this image just waiting for me. By framing the larger building in the doorway, I managed to say more about the entire village while still making a fresh image of the subject.

Here is a more intimate scene. By de-saturating the adobe walls and warming the remaining color, I was able to create the effect of a glow from the inside of this old ruin.

This last image was taken from an overlook several hundred feet above and about an eighth of a mile from the Mummy Cave Ruin in Canyon del Muerto, a side canyon of Canyon de Chelly. I used my 80-200 f2.8 Nikkor lens at 200mm. I thought about putting on my 400mm lens to get a tighter shot, but then realized that this magnification was perfect: it allowed me to show the subject in context; including the towering rock face above the ruin says much more about it than if I would have zoomed in for a tighter crop.
Share this:

The Evolution Of Vision
Artistic vision is not something that is easy to define, at least not in terms of individual style. It is something that is (or should) always be changing, evolving. When I look at the work that I was doing five years ago, I am struck by the difference from that which I am doing today. That’s as it should be. If I could see no discernible change, I would be worried that my creativity is stagnating.

Vision has to do not only with the subject matter you shoot, or the way you choose to capture it. It is also about how you take the image from the one in the camera to the one that hangs on the wall. So, post processing is just as important to expressing your vision as the initial capture, perhaps more important. This first image was made one January day on the edge of what was soon to become the Valles Caldera National Preserve and after many years of learning and evolving, both in my shooting style and in my processing technique, this is still one of my favorite photographs.

I tell my Beginning Digital Photography students that they should always be looking for new ways to present their subjects and of course this extends to the work they do in the digital darkroom. I made the above image in 2002. It is a close-up of burned tree bark that I took in the burn scar of the Lake Fire. This is pretty representative of the work I was doing at that time: close-up/macro/intimate landscapes.

The third image was made several years later and it is one of the very few I made during that time that included a hint of anything man-made. All of these photographs were made using film cameras. The first two were shot with a Nikon F3, the second, a Nikon F100. All three were made using Fuji Velvia transparency film.
Sometime around 2005, I began to feel that my strict adherence to shooting almost exclusively macro/close-ups was stifling my creativity and I began to broaden my horizons (both literally and figuratively). I had also purchased my first digital camera, a Nikon D200. Looking back, I think the new-found freedom of no longer being constrained by the cost of film played a major role in my ability to experiment with a new shooting style.

This black and white landscape was an early attempt to further break from my habit of excluding man-made elements from my images. I still hadn’t perfected my B&W conversion technique, but it was a step in the right direction.


When I was shooting mostly macro, I preferred diffuse lighting; no shadows means clearer details, but as I began to see the broad landscape, I began to take advantage of the multi-faceted nature of light. In the five images above, I make use of different kinds of lighting: overcast, early morning, evening, and mid-day with partial overcast. They each paint the landscape with a different brush and each portrays a different mood.


Lately, my work has come full circle, back to the subjects I was pursuing when I first started out all those years ago, which is to say–anything and everything. The difference is, I now have the expertise I lacked back then, so I am able to show my viewers what I saw in my mind’s eye before I released the shutter. That’s a good feeling, but it doesn’t mean that I feel I’ve reached some kind of photographer’s Nirvana; I am excited to see what kind of curve my vision will throw me next.
Share this:

Digging Through The Archives
I have been stuck in the Photographic Doldrums for the past couple of months, so I have been spending quite a bit of time searching my archived images. I’m not one to live in the past, but I’ve found that it can be rewarding to revisit my older work. I have rediscovered some of my best work rummaging around in old files. I have also found photographs that, for some reason didn’t make the cut when I first edited them, but over time, with my ever-changing vision and some changes in my workflow, they suddenly take on a new life.

This first image was taken in Canyonlands National Park in Utah. Mesa Arch is an iconic location for landscape photographers, but the shot almost everyone takes is of the sun rising behind the arch. Being a bit of a crank, and wanting to make an image that spoke of my vision and not some other photographer’s, I made this photograph in the late afternoon and used the arch to frame the incredible landscape that lies beyond it.

I made this image of Shiprock while driving to Utah a couple of years ago. I was drawn by the bright yellow rabbitbrush and I was also going through what I like to think of as my “fence phase”. These two elements made the perfect foreground for the great volcanic plug and brooding skies.

This is an image of the Virgin River in Zion National Park. The overcast settled lower and by the next morning, the rain was continuous, making my hike to the Subway impossible due to high water and flash flooding. But this moment, looking down canyon with the soft light penetrating the swollen sky is one of my best images from that trip.

Twilight at Chupadera Pond in Bosque del Apache NWR. These three cranes were hunting for their dinner. They had just flown back from a day of foraging in the farm fields at the northern end of the refuge and now they were continuing their seemingly endless search for food in the pond where they would spend the night. The color of the light in this image has not been altered. For one magical moment between sunset and the onset of night, the entire landscape was bathed in this golden-orange glow.

This final image of the Egg Garden in the Bisti Wilderness has gone through numerous iterations and I think I finally have it just where I want it. I know the composition goes against the venerable “Rule of Thirds”, but sometimes it’s good to break the rules, and sometimes it’s good to revisit the past.
Share this:

HDR: Thus I Refute Photographic Snobbery
I recently received an e-mail which made the argument that HDR is a polarizing subject in the photographic community. It led me down that road that forks and forks again and…well, you know. Are we as photographers to believe that we are (and should be) fenced in by rules? In this case the rules are about technique and processing. When photography was in its infancy, it was considered to be outside the realm of “serious art”. Now, nearly one hundred years later, it has become acceptable, but only if it fits in a certain box.
So, I am having trouble coming to terms with the ongoing debate inside the photography community concerning HDR processing. I consider the ability to blend exposures to expand the dynamic range of an image to be a wonderful addition to the photographer’s toolkit. There seems to be some divisive opinion about how much processing is allowable. What bothers me about this debate is one very important consideration: CREATIVITY! If someone’s vision requires that heavy and obvious HDR look, then who has the right to tell them it’s too much? Each one of us is different; we each see things in different ways and wouldn’t life be boring if we all agreed on everything?

This first image was made in the Bisti Wilderness last year. The landscape was other-worldly, and the dramatic sky added even more to that impression. In my post processing, I consciously emphasized that quality by making the HDR effect more obvious. I used a tool to help me achieve my vision.

The second image is from the same trip. It was made about an hour after the first. By then the skies had cleared somewhat, and, while the landscape is by no means common, it doesn’t quite have the alien feel of the previous image. This is also an HDR exposure fusion, but I backed off on the processing; I used the technique to enhance the contrast and to make the sky pop a little more.
So, two HDR images that express two very different emotions. I think I have succeeded in capturing my vision for each of them, and that is the point of art.
Share this:

Black and White, Toning, and Split Toning
When you convert an image to black and white, your creative options don’t end there. There are several ways to convey the mood of a black and white image, and strangely they involve color. Anyone who is interested in presenting their photographs in black and white should begin by learning the best way to make the original conversion. Perhaps the most direct method is to convert the image to grayscale using the command in the Image dropdown menu in Photoshop, but easiest is not always best. Before I go any further, let me acknowledge that there are many image editing applications out there, but for the sake of simplicity and because Adobe Lightroom and Photoshop are the applications I use, I will limit this discussion to those two.

A much better way to make your conversions is to add a Black and White adjustment layer in Photoshop, or if you’re working in Lightroom, use the B&W conversion tab in the Develop module. In either case, you will get a series of sliders which include all the colors in the spectrum from red to magenta. By using these sliders, you can adjust the tone of each color as they appear in black and white. In other words, you have much more control over the contrast and tonal range of your monochrome image.

If you want to take your image a little further, you can tone it by checking the tint check box in the B&W adjustment panel in Photoshop. In Lightroom, you can apply the toning by using the Split Toning panel in the Develop module. The image above has a sepia tone applied to it. I normally use at least a small amount of toning on all of my black and white conversions, but if I want to convey a certain feeling, I will use more saturation in the toning. I normally use either a sepia or a selinium tone, but you are not limited to these; you can choose any hue across the spectrum.

Finally, you have the option of doing a split tone. This is done by choosing a tone for the highlights and one for the shadows. There is no option for split toning in Photoshop. It must be done in either Lightroom or Adobe Camera Raw. Using the sliders in the Split Toning panel, you can adjust the hue and the saturation for each of the tones you choose. The above image has a very slight yellowish tone in the light areas, and a bluish (selinium) tone in the darker areas. I chose to use a split tone for this portrait to add a little more visual contrast and interest in the horse’s face.

This last image is one that I used in a recent post. I am re-posting this color version for comparison.
 I chose to make a sepia toned B&W conversion and I think this does a better job of conveying the feeling of melancholy that I had when I first encountered this scene.
So, the next time you find yourself wondering if your image might look better in monochrome, take some control over the process. You may come away pleasantly surprised.
Share this:

Give Me A Dramatic Sky
If you’re a landscape photographer, there is nothing worse or more boring than a clear blue sky. Don’t get me wrong, I love a crisp autumn day with cerulean skies as well as the next person, but when I’m out making images, I want some drama from above.
 Luckily, here in New Mexico, we get nearly as many days with stormy skies as we do with clear ones. I have always been deeply affected by the weather; when the barometer drops and the sky closes in, I get gooseflesh and I’m out the door with my camera and tripod.
 The first two images were made in the Rio Puerco Valley which is quickly becoming one of my favorite places to photograph. There are over fifty volcanic plugs, wide vistas, and beautiful stormy skies. The color photograph above is of the Rio Puerco, a (mostly) dry river for which the Valley is named.
 This last image was made near the small village of Torreon, NM. I had driven past these ruins many times, but on this day something told me to stop. The result was several good photographs, this being my favorite of the bunch.
So, the next time you see a storm brewing, grab your gear and head out to make some images. Oh, and you might want to bring a raincoat.
Share this:

In Praise Of Ruins
One of the nice things about living in a dry climate is: things are preserved. They are not washed back to the earth as quickly as they might be in a wetter climate. The desert southwest is famous for its ruins, not only those of the Anasazi, or Ancient Ones, but also of cultures that are more recent. I spend a lot of time making photographs in the desert where I come across a ruin on just about every trip. They may not be as famous as Pueblo Bonito at Chaco Canyon, but they speak of the past nonetheless.

Usually these locations are single dwellings, the remnants of someone’s dream slowly being reclaimed by the earth, but sometimes they are entire villages or settlements that were thriving communities, but are now nothing more than abandoned piles of crumbling adobe and rotting wood. The first two images are of ruins in the Rio Puerco Valley in north-central New Mexico

Many of the more well known and much older sites are of Native American origin. Pueblo Pintado is an outlier of Chaco Canyon and was inhabited from around 900-1250 CE. The image below shows one of the kivas in the foreground and the Great House behind it. The people who lived here were the forebears of the modern day pueblo people

Whenever I am in one of these places, I am overcome by a feeling of kinship with the people who lived and died there. I find myself wondering who they were and what they did to sustain themselves. What were their names? Why did these places fail and fall prey to time and the weather? In many cases, such as the ranching communities in the Rio Puerco Valley, it was overgrazing that forced the inhabitants out. In places like Pueblo Pintado or Mesa Verde, it is thought that drought played a large part in their demise.

This last image is one of twenty-three kivas in the Cliff Palace which was the largest cliff dwelling in North America. It housed about one hundred people in 150 rooms. There are close to six hundred cliff dwellings in Mesa Verde National Park.
Share this:

Black and White (Sands)
White Sands is an incredibly beautiful place. I don’t go there as often as I should; it’s only about a four-hour drive from my door. Every time I do go, I wonder why it’s been so long since my last trip. Of course, for me the attraction is the photography.

The stark landscape provides the perfect ingredients for great black and white images. Each of these photographs was made on the edge of light. The sun was low above the San Andres Mountains to the west.

Simplicity is the key; images that can be reduced to basic compositional elements are the ones that work best in monochrome. They can stand well on their own without the need for color. Don’t get me wrong I love making color photographs; I will continue to do so, but right now, I am re-discovering the power of the black and white image.

These three started as color versions because they were captured in RAW format. I followed my normal workflow, making global post processing adjustments in Adobe Lightroom and then moved them to Photoshop for the fine tweaks. The last step, the black and white conversions, were done in Silver Efex Pro.
I am pleased with the unexpected turn my photography has taken. As I mentioned in a previous post, I started out as a black and white photographer back in the day of chemicals, enlargers, and safelights. I feel like my work has come full circle.
Share this:

Take Your Camera
One of the first things I tell my beginning digital photography students is:“Always have a camera with you!”. I can’t begin to tell you how many times I have come across a wonderful scene and, without a camera, could only stand there and appreciate it. Not a bad thing, but as a photographer…!!!

I was driving into town for groceries-a sixty mile drive for me-and this scene unfolded along US Hwy. 550. I stood on the shoulder and waited until traffic cleared so I could make this image. Sometimes the light and the conditions combine to create a scene that may never happen again in exactly the same way. Be ready when that happens.

This image was made in a friend’s driveway. I was visiting him and noticed these leaves lying on the snow. I was drawn by the way they were nestled together and slightly embedded into the snow . I was taking my own advice that day and had a camera with me. The next time I visited him the leaves and the snow were gone.

This last image was made while I was driving from Albuquerque to Los Alamos to teach one of my classes. Just south of Santa Fe, these tracks cross under 1-25. I had gotten off the freeway and driven down the frontage road to the bridge over the tracks. I made several exposures of them from different points of view and was climbing up the bank to where my car was parked when I heard the whistle. The Southwest Chief (Amtrak), on it’s run from Chicago to Albuquerque was rounding the bend through the cut in La Bajada.
The point of these anecdotes is to illustrate the importance of being prepared. If you are in the right place at the right time armed with a camera a whole new world of possibilities opens up. To paraphrase Jack London: “You can’t wait for opportunity, you have to go after it with a club”.
Share this:

The Bones Of The Image
Sorry about the bad pun, but this seemed like the perfect image to drive home the idea that black and white photographs are more about the structure, tones, lines, and shapes of the photograph, whereas a color image can distract from those basics.

All of the various skeletal segments in the left foreground create lines into the image; they all lead the eye in about the same direction-towards the mesas in the background. The eye then should travel in a kind of spiral: up to the clouds and then back down to the distant double peaked mountain. The focal point (hopefully) is the carcass; the lack of color in the (blue) sky, and the (yellow-ish) grasses means that there is nothing to distract the viewer’s eye from it.

I made this image last year on a trip to the Bisti Wilderness. I had some luck with the atmospheric conditions that day and came away with several very good photographs. This one of the Bisti Arch is one of the best from that outing, and while I think the color version is pretty strong, I feel the black and white conversion says more about what I was seeing and feeling when I captured the image.

Also, the second image has more dynamic tonality; the saturated colors in the first capture the viewer’s attention, but the rich tones in the monochrome version say more about the structure of both the formation and the composition of the image.


